Join a Session in Blackboard

Note: This only applied to Bb Collaborate sessions scheduled through Blackboard courses.

Instructors: You need to provide a link for your students to access the Blackboard Collaborate Scheduling Manager in order for them to be able to join live sessions or watch recorded sessions. Here is how to Create a link to the Bb Collaborate Tool.

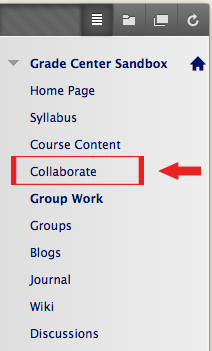
Students: There should be a link called Collaborate (or Blackboard Collaborate, or Virtual Meeting, or Virtual Office Hours, or something similar) somewhere in the course menu on the left in your Backboard course.

Example menu


Go to the Bb Collaborate List Page (methods may vary). Usually, it is accessible from the menu on the left in your Blackboard course, either from a link called Tools, or Collaborate. Note: If you are unclear how to access the page, ask your instructor; they might need to provide access.


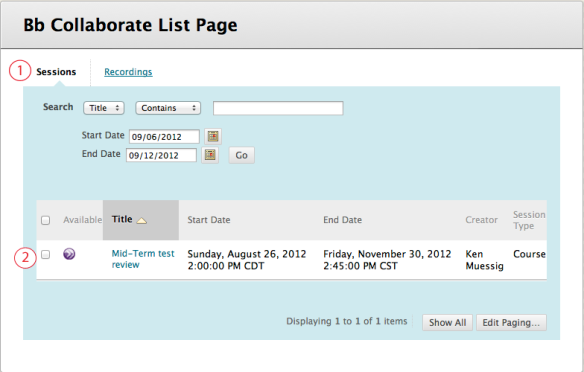
On the Bb Collaborate List Page there are two tabs: Sessions (default) and Recordings.

  1. You will be on the Sessions tab by default.

Click on the link that represents your session to join


  1. You should see the title of the session. Note: If the title is not a clickable link, that means that the session is not active (you are either too early or too late).
  2. Click on the title to join the session. Note: It will ask you to download and run a small Java file before the session will start.

 

Java Web Start cannot find message file

Error message: Java (TM) Web Start 1.6.0_31 Can not find message file

The local file that helps Collaborate start up a little faster is corrupted.

Solution: Delete the existing one and see if that clears up the problem. It will download a fresh copy when you launch a new session.

Windows:

  1. Open Control Panel and then open the Java Control Panel
  2. On the General tab, under the heading Temporary Internet Files, click on View…
  3. That will pop-up the Java Cache Viewer. Highlight the Blackboard Collaborate in the application list and click on the red X to delete.


If that did not solve the problem, follow the next steps:

  1. In the same Java Control Panel on the General tab
  2. Under the heading Temporary Internet Files, click Settings…
  3. Under the heading Disk Space, click Delete Files…
  4. This will delete all cache files and should fix the problem.

If that did not solve the problem, visit this site and follow the instructions (carefully): http://support.blackboardcollaborate.com/ics/support/default.asp?deptID=8336&task=knowledge&questionID=2392


Apple OS X:

  1. Open Applications, Utilities, and open Java Preferences
  2. Click on Network tab, and open View Cache Files…
  3. That will pop-up the Java Cache Viewer. Highlight the Blackboard Collaborate in the application list and click on the red X to delete.

Close all of those pop-up windows and try to launch a new session of Collaborate, it will download a new copy of that file.

Can't watch recording in Internet Explorer 8

If you receive the error message:

Unable to download get.recording.play.event from learn.uark.edu.
Unable to open this Internet site. The requested site is either unavailable or cannot be found.
Please try again later.

The problem is with your web browser.
Currently, Microsoft’s Interent Explorer 8 does not recognize the script necessary to start the Collaborate recording. There will supposedly be a fix for this in the future.

The quick solution is to either:

Save a Copy of Recording

When you record a session, the file of the recording is hosted on the Blackboard Collaborate servers out in the cloud, not on the UA campus.

Therefore when a Blackboard Learn course gets copied into a new semester, links to previous recordings could be lost, or if the U of A discontinue the license, you could lose access to recordings hosted on the Bb Collaborate servers.

If you want to save a local copy of a recording to keep, you will need to install a program called Publish. It will let you download a stand alone JAR (Java ARchive) copy of your recording. You can also use Publish to produce the video in .avi, .flv, .mov, H.264, .mp4, .mrf, and .wmv formats.

Download Bb Collaborate Publish

In order to use Collaborate Publish you will need a license key to verify that your are a University of Arkansas affiliate. You can obtain the license key by contacting the U of A  Collaborate administrators. Be sure to fill in your UARK email account, because we will only send the key to valid UARK email accounts.

You will also need the URL to recording. Example: https://sas.elluminate.com/p.jnlp?psid=2012-01-15.0930.M.4R57284F6B20759455AA02E22CECBB.vcr&sid=2100107 

  • If you scheduled the session through Blackboard Learn, contact the U of A Collaborate administrators with the title and the approximate date and time the recording was made and they will email the URL to you.
  • If you scheduled the session outside of Blackboard Learn, then you received an email from the Collaborate server with the link to the recording.

Publish documentation

View Recorded Session in Blackboard

NoteThis only applied to Bb Collaborate sessions recorded through Blackboard courses.

If you miss a session and it was recorded, you can view a list of recorded sessions from the Blackboard Collaborate tool page.

Go to the Bb Collaborate tool page (methods may vary). Usually, it is accessible from the menu on the left in your Blackboard course, either from a link called Tools, or Collaborate. Note: If you are unclear how to access the page, ask your instructor; they might need to provide access.

On the Bb Collaborate tool page there are two tabs: Sessions (default) and  Recordings.

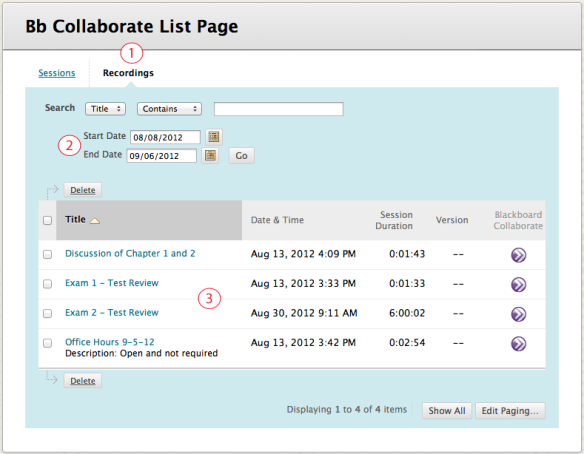
  1. Click on the Recordings tab.

On the Collaborate tool page, click on Recordings and all recordings for the previous 30 days will be listed.

On the Recordings tab notice:

  1. That the Search area defaults to show recording from the previous 30 days. If your recording is not listed, interact with the search fields to see if it occurred farther back in the past, or try searching by the title.
  2. All recordings that fit within the time frame of the Search area will be listed here. Click on the title to start the recording. Note: It will ask you to download and run a small Java file, before the recording will start. And after the recording loads, there is a play button at the bottom, and it may take a few seconds to start playing.


Grant Moderator Privileges to Participant

Remember: Collaborate uses a neutral naming convention. A moderator a person in control of the virtual meeting. Typically the moderator is the instructor. A participant has fewer abilities in the meeting and are usually students.

Faculty often use Blackboard Collaborate to allow student to present papers or projects to the rest of the class virtually. In order for the student to be able to upload a Powerpoint or OpenOffice presentation they will need moderator privileges.

There are two ways to give moderator privileges to participants:

  1. In a live Bb Collaborate session
  2. When scheduling the session in Blackboard

Live Bb Collaborate session

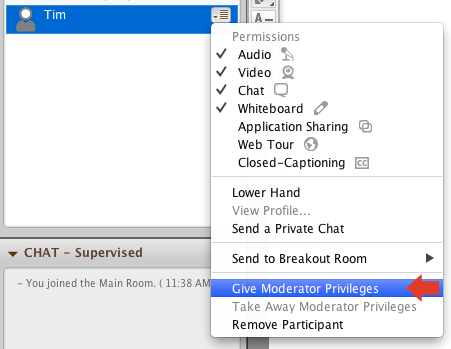
Locate the student requiring moderator privileges in the participant list. Hover the mouse pointer over their name until the edit button (looks like several small horizontal lines) appears and click on it.

Hover over participant name and click edit button

In the resulting menu choose Give Moderator Privileges.

Choose Give Moderator Privileges

The student will then be able to upload their presentation. For instructions how, visit Upload Presentation.


When scheduling the session in Blackboard

You can designate one or more students to automatically be moderators when they join the session. For detailed instructions view Scheduling a Session in Blackboard

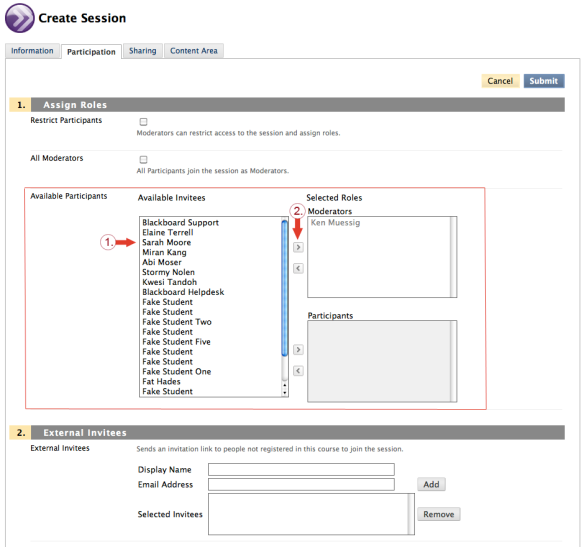
In the scheduling tool, on the Participation tab, locate Available Participants.

  1. Click on a student to select them.
  2. Click on the arrow to ‘move’ that student into the Moderators areas. Click Submit to save changes. And when that student joins the session they will automatically have moderator privileges.

Select a student and move them to moderator area

Bb Collaborate Scheduling Tool Overview

Once you have opened the Bb Collaborate Tool you will see 5 areas of interest.

  1. Click this button to create a session -(for details on creation see: Scheduling a Session in Blackboard)
  2. The tabs allow you to switch between scheduled session and recordings of past sessions. The recorded sessions will appear in a list (if you do not see the recording you are looking for, check the dates and change the search parameters) and click the title to view.
  3. The Search area defaults to show scheduled sessions set to occur for the next 7 days. Use the various fields to refine the search.
  4. Course Defaults permits the instructor of the course to set defaults for Collaborate sessions created in the course allowing quicker session create for the future of the course.
  5. This area displays scheduled sessions; both upcoming and active sessions are displayed (how long into the future it displays depends on the Course Default). If the session is active the title will be a clickable link. If the session is not yet active the title will be not be a link.

Collaborate Scheduling Tool

Locate the Bb Collaborate Scheduling tool in a Course

Within Blackboard there are 2 locations that grant access to the Bb Collaborate tool:

  • Location 1: The Course Management Control Panel (Figure 1)
  • Location 2: From within any Course Content area (Figure 3)

Location 1 – in the Course Management Control Panel (second menu down on the left):

  1. Click on Course Tools
  2. Click on Blackboard Collaborate
(Figure 1)
Course Tools

Location 2 – from within any Course Content area:

  1. In the breadcrumb area, make sure Edit Mode is ON  (Figure 2)
  2. In the content area tool bar (of any Bb content area), click on Add Interactive Tool (Figure 3)
  3. Click on Blackboard Collaborate

(Figure 2)
Edit Mode ON

(Figure 3)
In Content Area add Interactive Tool

Scheduling a Session in Blackboard

Download a detailed description of the available options for creating Collaborate sessions. Creating Bb Collaborate session within a Bb Learn course (PDF).

If this is your first time to schedule a session and you need to find the Blackboard Collaborate Scheduling tool visit: Locate the Bb Collaborate Scheduling tool in a Course

If you would like an overview of the main Blackboard Collaborate tool page visit: Bb Collaborate Scheduling Tool Overview.

Assuming that you have click on the Create Session button, you will see 4 tabs across the top [Information – Participation – Sharing – Content Area].

To create a quick and simple Collaborate session you only need to change the settings on the top half of the Information tab.

1. Session Information

  1. The Session Title defaults to the course name. It is recommended that the title be changed to something that is more meaningful to the students, e.g. PSYC 2001 – Dr. Smith – Week 3 – Discussion on Freud. The maximum number of characters for the name is 64.
  2. The Session Type defaults to Course, meaning that only students enrolled in this course will have access to the Collaborate session. If you select Shared that will make the Collaborate session available to all students in all of Blackboard Learn courses that you teach. Or alternately in the Courses field, you can select which courses (that you teach) that will have access to the session.


2. Schedule

  1. Set the start and end date and time for your session. The end time is not a strict cut off; the session will remain open until all of the participants have left the session.

Note: You can use Collaborate to create a virtual office for your course, select a block of time equal to the semester (exactly 1 year is the maximum – any longer will return an error). Post in your syllabus the times you will be logged in and virtually available.

  1. Early session entry defaults to 30 minutes. This is the amount of time that students can join the session before the start time you set. This time allows them to run the Audio Set-up Wizard and make sure their speakers, microphone, and webcam are configured properly.
  2. If you check Repeat Session, an addition panel opens and let you configure when and how often to repeat the session. It can be a time saver if you plan on having several sessions on the same day and time over the duration of the semester.

The image shows the scheduling page representing the ordered list of options.

At this point you can click Submit and the session will be created and ready for use.

If you would like more information about advanced settings please see the Blackboard Collaborate document: Scheduling a Blackboard Collaborate Session Building Block 3-0 located at: http://www.blackboard.com/getdoc/3b4fdab5-1fd8-4d02-8f57-f469897966b3/Building-Block-3-0-Session-Scheduling.aspx

Or you would like detailed information about all of the available options for creating Collaborate sessions view the PDF: Creating Bb Collaborate session within a Bb Learn course.

Instructions from Blackboard ™ Scheduling a Blackboard Collaborate Session in Building Block v. 3.0 (PDF)

Audio Problems?

Audio not working?

For speakers or microphones troubles run the Audio Setup Wizard to make sure that the computer’s speakers and microphone are set up correctly.
Go to Tools > Audio > Audio Setup Wizard and follow the directions there.


Microphone still not working?

Is the Talk button (at the bottom of the Audio & Video panel) off?

Talk button is off

Turn the Talk button on by clicking on it.

Talk button is on

Is the Talk button grayed out?

Talk button unavailable

That means there is only one ‘talker’ allowed (and someone else has their mic on).
Someone with Moderator privileges will need to go to Tools > Audio > Maximum Simultaneous Talkers and increase the number.